Magento Custom Modules Demystified - Part 2
Part 2 - Models
Important Preface: etc/config.xml
Every aspect of a custom module is initially controlled/declared in its config.xml file, within the etc directory. In many cases, the entries will basically resemble stubs - such as declaring base class prefixes to be used in the generation of all derived classes. Now, in our fictional module called Namespace Module, the folder structure underneath app/code/local would look something like this.
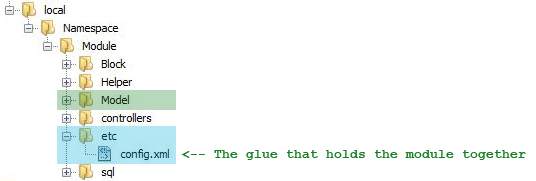
In this installment, we are going to focus on simple Models (there are more complicated EAV-based Models that can exist in Magento, but in many cases that would be unnecessarily convoluted overkill, so we won’t discuss those.) Generally speaking, a Model in Magento creates the structure of any data “object” we might want to use in our module. An important exception to this rule is an Observer - which is a very specific type of Model designed to intercept various points in code execution rather than an abstraction of an object - we will discuss Observers in more detail later in this series. The components that comprise a Model include a series of properly nested class files which extend the core classes responsible for a Model’s behavior, a custom table to store it and define its structure, and entries in the config.xml file to tie it all together. For our example, let’s assume we are trying to create a Model called “Thing.”
The nested class files

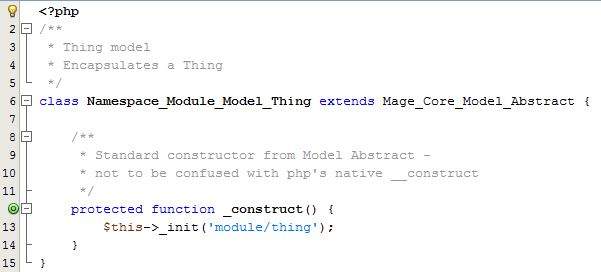
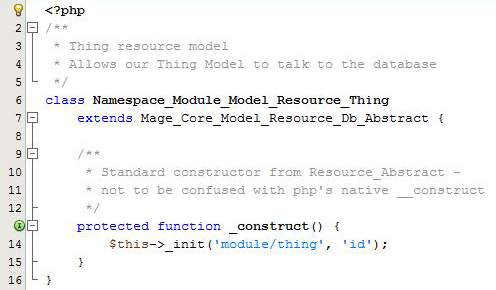
Our Thing consists of the Model itself, a Resource Model which allows it to talk to the database, and a Collection class which provides the ability to manipulate multiple Things at the same time. Like most aspects of Magento, this initially seems more complicated than it needs to be, but the fact is that these files usually contain only classes which extend the related core classes.
In our case, the Model:
the Resource Model:
the Collection:
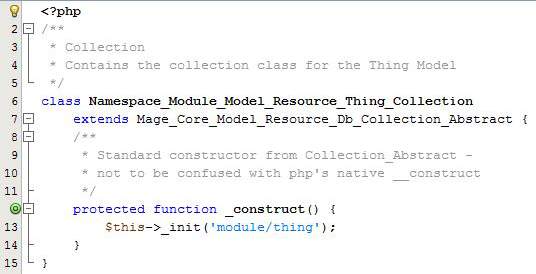
Note the capitalization and class-naming conventions in what basically consists of stub code designed to extend classes. In the class name, you generally have words that start with initial caps, separated by underscores. In places within code where you instantiate the classes, you use an all lowercase declaration separated by a slash. This convention pattern is often referred to as a “factory method” - classes are easily instantiated by the the Varien_Autoloader class, which discovers and “builds” any class that Magento doesn't already “know” about. This eliminates the need for php “include” or “require” - which is a good thing, because you don't have to touch core for Magento to find and execute your code.
The Custom Table in the MySQL database
In the resource model for our Thing, we indicated that a column “id” is the primary key for a single instance of the Thing in the database. Part of the magic of this Magento structure is, you don’t have to declare any of the other columns in code - they will be found by Magento as long as the columns exist in the custom table we create for our Model. In this case, we have a table named “module_things” to define the structure of our Thing Model. In addition to the id primary key field, we have defined our Thing to have uid (the user id of a webstore customer who "owns" the Thing), color, shape, and size properties.

But how does Magento know what custom table to use - or anything else for that matter? Here's where config.xml becomes vital to the process. Here are snippets from the <config><global> section:

Under <resources> we define the basic class structure we are going to use for our entire module. Since we have named this module “Module,” we have three sections to indicate: <module_setup>, <module_write> and <module_read> (if our module was named “Pony,” it would be <pony_setup> etc.). The <setup> indicates the name of the Module and the core classes to use to manipulate it. The <connection> in each case indicates that we are using the core_setup, core_read, and core_write methods.
The <models> section is where we define Models for our module. The <class> is simply our class prefix - this tells Magento what pattern to use to discover classes related to our Model when called using factory methods. It also defines the <resourceModel> to be “module_resource” - then immediately below, you see <module_resource> defined. It is given a class prefix in <class>. Under <entities> you finally see where we tell Magento the table names to use when manipulating our Model. In the example above, we are defining three separate Models in our fictional module - Thing, Stuff, and Doodad.
Now, putting it all together, the use of “module/thing” tells the autoloader where to look in the directory structure to find the file which contains the class. It discovers in the config.xml that there is a type called <module> within the <models> section whose class prefix is “Namespace_Module_Model.” From there, it can extrapolate file paths/class names for our Model. For example, if you call $thing = Mage::getModel('module/thing') in your code, it would know to look for the class “Namespace_Module_Model_Thing” within the file app/code/[[codepool]]/Namespace/Module/Model/Thing.php. Codepool refers to the fact that as a part of Magento “fallback,” it will first search within the “local” code pool, and if it doesn't find it there, it will search in the “community” code pool. Finally, it will search in the “core” code pool before basically giving up. The more you delve into the code, you begin to see very distinct and predictable patterns which - although complicated - are not actually as difficult as they seem at first. Capitalization, directory nesting, and naming conventions are your friend.
Once your Thing exists, you can declare it in code elsewhere within your module, create instances of it, edit it, manipulate it however you want. Loading a specific instance of your Thing is as simple as $thing = Mage::getModel('module/thing')->load($id) and likewise, you can retrieve or alter the data for this instance using ->getData() and ->setData(). If you knew of a Thing with an id of 1, and wanted to get its color, you would call $thing->Mage::getModel('module/thing')->load(1) then $color = $thing->getData('color').
One final note about getting and setting properties of a Model - Magento’s 1.x structure allows for something often referred to as “magic” getters and setters. If you have followed the all-lowercase naming convention of columns within your Model’s table, you can now access them in - guess what - a camelCased fashion (even though your column names were all lowercase). Instead of $size = $thing->getData('size') you could use $size = $thing->getSize(). Instead of $thing->setData('size') = 'big' you could use $thing->setSize('big'). I only mention this to demystify something you may often see in core and in other modules - there has been a rumor that when Magento 2.0 comes out, they will get rid of these magic getters and setters, so it’s best to avoid this as much as possible to upgrade-proof your code.
Stay tuned for the next installation, where we will discuss Blocks.


